-
Lay the moisture-proof plastic sheet
By first laying a moisture-proof plastic sheet you will protect your floor against the effects of damp. This is definitely advisable when laying laminate on top of a new concrete floor.
Click the laminate into place
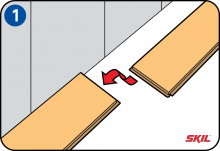
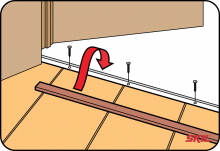
Lay the first row of planks, starting at the left side with the groove along the wall. Tilt the end of the laminate upwards slightly and click it into place. -
Is the first row of planks straight?
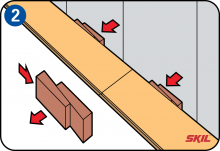
Check that the first row of planks is straight. If there are any differences in the gap between the planks and the wall, you can correct these if necessary with spacer blocks or wedges.
-
Pakāpiens
Allow some extra laminate in case a part of the floor becomes damaged. Then you will be able to repair it quickly. The best direction in which to lay laminate flooring is in line with the direction of light entry (windows). Because of possible color differences, it’s advisable to mix laminate from different packages. -
Use a pull bar
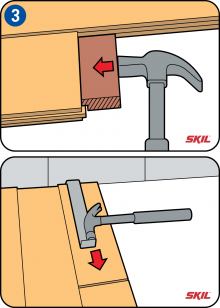
Click the ends of the planks together securely and tap them carefully into place with a tapping block. Where there isn’t enough space to do this at the end of a row of planks, use the pull bar to click the last plank into place.
-
Cutting the planks to length
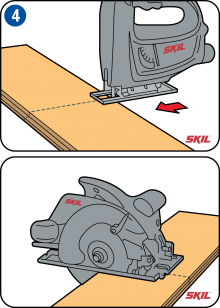
If you use a fine-toothed hand saw, lay the plank with the top surface facing upwards.
If you use a jigsaw or circular saw, lay the plank with the top surface facing downwards. -
Pakāpiens
Special saw blades are available for laminate. These have reversed teeth so that you can cut the laminate with the top surface facing upwards (instead of upside-down), and the rough edge will then be on the bottom surface. -
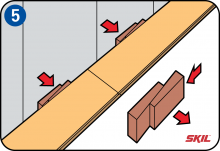
Place spacer blocks
Laminate flooring can shrink or expand because of variations in room temperature and humidity. To allow for this, keep a gap of about 8 mm at all sides of the floor. By using 2 spacer blocks or wedges, you can easily adjust this gap to match every wall.
-
Clicking the next row of planks into place
Start the next row of planks with the remaining piece from the previous row. This should be longer than 40 cm. For the best appearance of the finished floor, make sure all the remaining pieces are the same length – this gives a regular pattern and minimizes waste. Or for a more informal effect, you can make the pattern irregular.
-
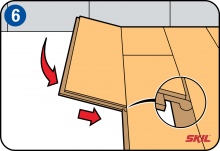
Lay several planks at the same time
After you’ve laid around 8 rows of planks, the floor will be joined together strongly enough to allow you to lay a row of several planks together. Tilt the whole row upwards slightly and then click the planks into the previous row. It’s easier to do this if someone else helps you.
-
Laying the last row of planks
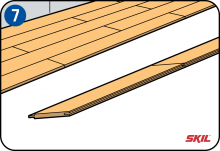
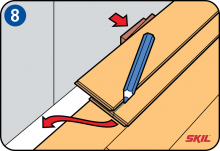
When you lay the last row of planks you will probably have to saw the planks lengthways. The easiest way to do this is to place the last plank exactly on top of the next-to-last row with the top surface facing downwards. Then put the 8 mm spacer blocks into position along the wall, place a new plank against the spacer blocks and use the edge of this plank to mark off the cutting line on the underside of the last plank below it. Then you can saw the plank to the right width. Make sure the groove is on the right side.
-
Related jobs
Fitting finishing profilesYou can use special finishing profiles for the threshold between laminate flooring and other kinds of floor covering such as carpet or vinyl. First fit the fixing rail on the floor and then click the plinth into place on top of it. You can also buy strips that fit directly onto the floor, but then the fixing screws will be visible. Special rosettes are available in matching colors to cover the holes for central heating pipes.
-
Laying plinths
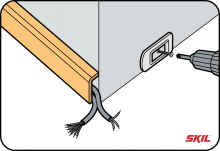
Fixing plinths with clips or adhesiveYou can fix the plinths with construction adhesive, or with clips if you are using hollow plinths. Hollow plinths can be used to conceal internet or power cables.
-
Laying plinths
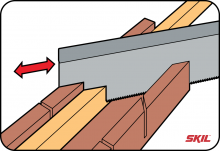
Cutting plinths to length at an angleYou can use a miter saw to cut plinths to length cleanly at an angle of exactly 45°. You can also use a hand saw in combination with a miter box. Of course you can also saw the plinths off at 90° and finish the ends with PVC caps in a matching color.
-
Extra tips
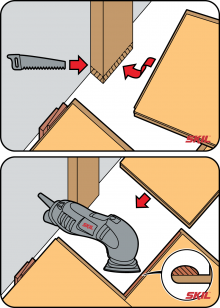
Laying laminate flooring under the door frameIf you have undercut the door frame to allow the laminate flooring to be pushed underneath it, you won’t be able to tilt the laminate to click it together with the next plank. You can solve this problem by sanding away the raised part of the protruding click-fit tongue (see second illustration below). Then you can push the tongue into the corresponding groove without the need to ‘tilt and click’.
-
Pakāpiens
Check that you’ll still be able to open the doors after laying laminate flooring, and that the door frames have enough space underneath them to push the laminate under. If necessary you may have to trim the bottom of the door and undercut the door frames.

