-
More comfort is within reach
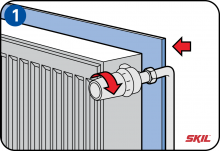
Pipes that run through the wall are difficult to insulate because of the lack of space. But what you can do is fill the gaps in the wall with PU foam or mineral wool. The aim of pipe insulation is to reduce heat losses between boiler and radiator or convector to an absolute minimum. The radiators themselves radiate heat in all directions, including towards the walls. And if the wall is a non-insulated outside wall, you’ll lose a lot of heat through it. A good solution is to fit a reflector panel or foil behind the radiator. That prevents heat loss and increases comfort in the room. Which means you can lower the thermostat setting.
-
Insulation color code
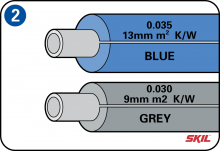
The effectiveness of insulation is expressed as an R-value. The more the insulating material resists the passage of heat, the higher the R-value and the more effective the insulation. Gray 9 mm pipe insulation has an R-value of 0.030, while blue 13 mm pipe insulation has an R-value of 0.035.
-
Pipe insulation
Polyethylene has a high R-value, so it has excellent insulating qualities. This material is flame retardant and sound-absorbent (less noise in the pipes). It's easy to apply because it is flexible and easy to slide over the pipe. It is also non-shrink.
-
Cutting the insulation tube to length
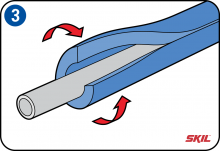
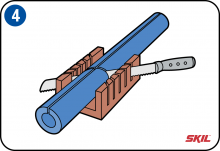
Cutting the insulation tube to length is very simple. Use a mitre box in which you can cut the insulation tube at angles of 30° and 45°. To cut the tube you can use a breadknife with a 30 cm straight blade. Pull the tube open along its length and push it over the pipe. Then you can seal the insulation tube with double-sided adhesive tape or insulating tape.
-
T-pieces
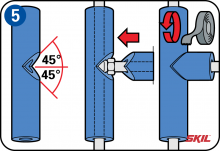
Start by applying the insulation at the bends, T-pieces and branches in the pipes. For T-pieces, make a 90° wedge-shaped cut-out in the main tube section extending through to the middle of the tube. In the tube to be joined at 90°, cut off the end at two 45° angles to form a point. Then insert the pointed end into the 90° cut-out in the main tube, so that the two tube sections join neatly. Wind insulating tape around the T-piece to seal the joint.
-
90° right-angle bend
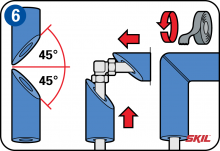
Using the mitre box, cut off the ends of 2 lengths of insulation tube at an angle of 45°. Fit both lengths of insulation tube over the pipe so that the 45° ends come together at the 90° right-angle bend, and press the 2 ends together. Wind insulating tape around the bend to seal the joint.
-
90° curved bend
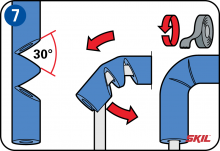
Place the insulation tube in the mitre box with the slit facing upwards. Cut out 2 notches close to each other to almost the full depth of the tube, each with an angle of 30°. Fit the insulation tube with the notches facing the middle of the curve in the pipe. Then wind insulating tape around the cut-outs to seal the joints.
-
Wall brackets
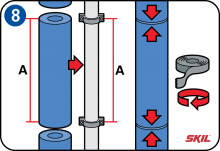
Measure the distance from the end of the last piece of insulation tube to the wall bracket, and cut a new piece of insulation tube to this length. Fit the tube around the pipe, and then continue with a new piece of insulation tube. Press the ends of the two insulation tubes firmly together and fix them in place with insulating tape.
-
Step tip
Make sure that all joints are well sealed and wound with insulating tape. This will ensure the best possible insulation.

