-
Dimensions of the soapbox cart
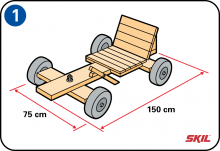
The dimensions of the soapbox cart are about 1,2 to 1,5 metres long and about 75 cm wide. The height is determined by the diameter of the wheels. The bigger the wheels, the higher you’ll be above the ground. The dimensions will also depend on who’s going to drive the soapbox cart. You can choose the dimensions to match your own preferences. The same applies to the choice of materials for the frame, wheels, steering system, brake(s) and seat.
-
Wheels of the soapbox cart
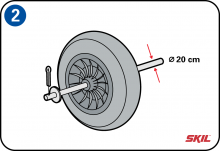
You’ll need four wheels of the same diameter for your soapbox cart. Different kinds of wheels are available from do-it-yourself outlets, for example for wheelbarrows. You can also use the wheels from an old pram, or from a child’s bike. It can sometimes be difficult to find metal axles of the right size to match the diameter of the wheels. You can use old handrails or fence uprights, or you might be able to find metal rods in a do-it-yourself outlet. We’re using wheels from a wheelbarrow, with a diameter of 360 mm and axles with a diameter of 20 mm. The wheels of the soapbox cart are secured by washers and split pins.
-
Metal axles
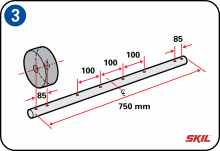
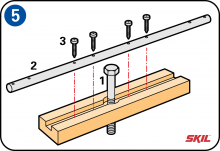
Drill eight 5 mm holes in the 20 mm diameter metal axles (with a length of 750 mm). Working from the middle, drill two holes at the left and right sides, with gaps of 100 mm between them. These allow you to screw the axle firmly in place to the front and back cross-members of the soapbox cart. Drill two holes at the ends of the axle for the split pins to secure the wheels. This distance depends on the width of the wheel hubs + the securing washers + free play.
The wheelbarrow wheels that we’ve chosen have a diameter of 360 mm, a tyre width of 85 mm, an axle end-hole of 20 mm and a hub width of 75 mm. The two holes for the split pins are then located at: 75 mm + 2x the washer thickness of 3 mm = 6 mm + 2x the free play of 2 mm at each side = 4 mm, is a total of 85 mm. The gap between the inner split pin and the back cross-member is about 10 mm on each side.
-
Back cross-member of the soapbox cart
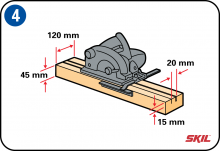
The front (steering) and back cross-members are made from wood beams measuring 45 x 120 mm and 540 mm long. Both these beams have a groove in the middle to hold the metal axle. This groove is 20 mm wide and 15 mm deep, and extends along the full length of the beam. Use a circular saw set to a depth of 15 mm to make two parallel cuts in the beam. These mark the sides of the groove. Then, cut out the rest of the groove between the two saw lines with a chisel. It’s even easier to cut out the groove if you have a router. After that, screw the back axle firmly in place in the middle of the back cross-member.
-
Front (steering) cross-member of the soapbox cart
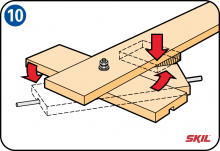
Next, assemble the front wheel axle of the soapbox cart in the same way as the back cross‑member, but before you do that you first have to fit the M12 bolt with a length of 12 or 16 cm. Drill a 12 mm hole in the middle of the front (steering) cross-member. Then use a 20 mm drill to cut out a recess of about 30 mm deep for the head of the M12 bolt.
- Tap the head of the M12 bolt firmly into the 30 mm deep recess to prevent the bolt from turning during assembly.
- Then place the metal axle in the middle of the front (steering) cross-member.
- Finally, screw the axle assembly tightly together.
-
The soapbox cart frame
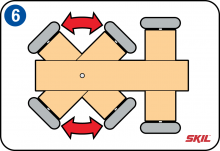
The distance between the front and back axles of the soapbox cart isn’t fixed, but there needs to be enough space to allow the front (steering) cross-member to turn easily. Next we use a broad plank with a width of 220 mm to make a frame with a length of 150 cm. We won’t use composite material, because wooden planks have better weather resistance. Using a 12 mm drill, make a hole at a distance of 18 cm from the front, into which you push the bolt of the front (steering) cross-member. Then fix the back cross-member under the back of the soapbox cart.
-
Fit the front (steering) cross-member
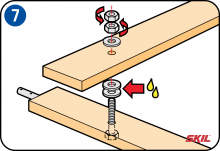
The front (steering) cross-member is pivoted to the frame of the soapbox cart by the 12 mm bolt mentioned earlier. This bolt has an unthreaded part at the top. Of course it needs to have some free play to allow the front (steering) cross-member to turn freely. Fit two large metal washers onto the M12 bolt and put some grease between the washers and the bolt. Push the protruding end of the M12 bolt through the opening in the frame, place a metal washer on the threaded end of the bolt and fit the two M12 hex-head nuts. You can also use self-locking Nylon nuts to prevent them from loosening because of vibration. Tighten the nuts in opposite directions using two wrenches of the right size or an adjustable wrench.
-
Fit the wheels
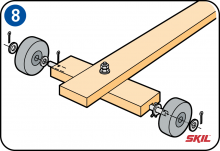
The two holes at each end of the metal axle allow you to fit split pins to secure the wheels in place together with the two washers. Make sure the wheels can turn freely, so put some grease on both ends of the axles to avoid excessive wear. It’s a good idea to apply some more grease after a few weeks. If you’re using pneumatic tyres, it’s best to fit the wheels so the valves are on the inside.
-
Korak nasvet
If you fit a towing hook at the front of your soapbox cart, it’s easy to pull it forwards. -
The seat
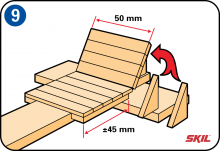
It’s worth putting a good seat on your soapbox cart, and it’s easy to make. You need five planks with a length of 50 cm for the seat itself, and another four planks of the same length for the backrest. Screw two more planks of the same width and thickness and a length of about 45 cm on both sides under the seat. These allow us to screw the seat firmly in place against the frame. The backrest with four planks fits at an angle against the back plank of the seat. Then we make two triangular pieces with an angle of about 60°, and we screw these in place to both the backrest planks and the back part of the frame. To make the seat more comfortable, you can put a cushion on it!
-
End-stop for the front (steering) cross-member
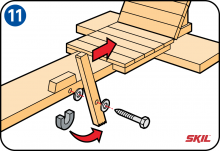
The end-stop for the front (steering) cross-member is fitted underneath the frame. This end-stop acts as a safety stop, and prevents the front axle from turning too far against the frame, which could make the soapbox cart overturn or could cause foot injuries.
-
The brake
We make the brake out of a movable beam in which we saw grooves or fix a piece of car tyre to the end, so the braking beam doesn’t wear so quickly.
Screw the brake beam securely to the frame. You can do this on either the left or the right side. When you pull the brake beam backwards, it presses against the ground so it slows the soapbox cart down. It’s a good idea to fix a reinforcing block to the frame to withstand the braking force.
-
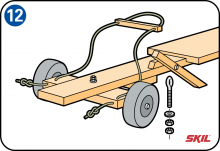
Steering system
To make the simplest steering system, we drill two horizontal holes for the steering rope at the extreme right and left sides of the front (steering) cross-member. Drill these holes at an angle so they emerge through the top of the axle and half-way across it. Of course you can also fix the steering rope using two eye bolts. Make sure the knots at the ends of the rope are big enough to stop the rope from passing through the holes. Fit a short wooden plank to the top part of the rope to stop it from cutting into the driver’s hands.

