-
Building the frame
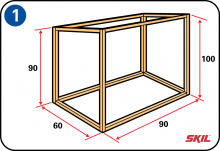
The first step is to build the outer frame. As you can see in the drawing, the frame is made of 32x32 mm beams. Use a spirit level to check that all the corners are straight and properly aligned.
Supporting frame
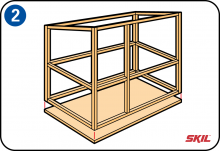
This part of the frame is needed to support the floor panel and to fit the surround. The size and structure shown here are intended a guide, and you can change the size to meet your own preferences. -
Make sure your rabbit can’t escape
To prevent your rabbit from escaping and digging a rabbit hole, you can fit a floor panel in the rabbit hutch. If you don’t mind your rabbit digs into the ground, it’s a good idea to put some strong gauze under the ground (about 20 cm deep). Then your rabbit will have the freedom to dig, but won’t be able to escape.
-
Floor panel and steps
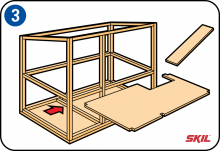
Before you assemble the structure, saw out a piece of shuttering plywood of the right size and shape and secure it in place. Make a walkway or ladder from a piece of plywood and fit it in place in the opening as shown in the drawing. Fit a cross-piece to fix the walkway and screw it in place.
-
Make the sidewalls
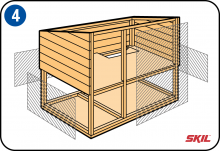
Make the sidewalls of the rabbit hutch by screwing the planks to the frame. Pre-drill the holes for the screws to prevent the wood from splitting. Fix the gauze to the openings using a staple gun or tacks.
-
Fit the interior panel
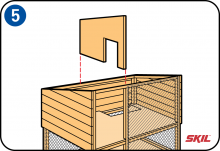
The interior panel is intended to protect to serve as a night shelter. Make an opening in the panel that’s big enough to let your rabbit go in and out.
-
Fitting the finishing strips
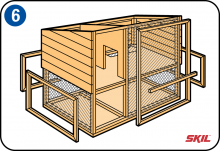
Finish the outside of the hutch with decorative strips to cover the sharp edges of the gauze. Then follow the instructions as shown in the drawing. Pre-drill the holes to prevent the wood from splitting, and check that all the corners are straight and properly aligned.
-
Make the doors
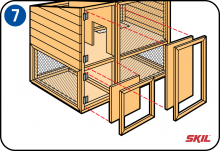
Make the doors as shown in the drawing. Let the decorative strips overlap so the doors are a better fit against the frames. Make sure there’s enough space for the lower decorative strip of the upper door and the upper decorative strip of the lower door so they can turn freely. Make the sizes big enough so there’s some play in case the wood swells. Fit the doors in the opening, using two galvanized or stainless steel hinges on both doors. Fit bolts on the upper and lower doors.
-
Finishing the roof
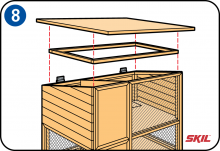
Make a roof frame from beams of the right size, so the frame is covered by the outside of the rabbit hutch. Make the roof panel from a piece of 12 or 18 mm shuttering plywood or waterproof plywood.
Screw the roof panel to the frame with two hinges. Make sure the roof panel overlaps by at least 5 cm all round, and by 10 cm at the front. That prevents water entry, so the inside of the rabbit hutch stays dry.
-
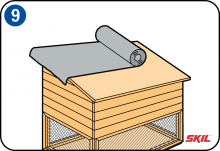
Finishing the roof
It’s important to make sure that the roof of the rabbit hutch is waterproof, so cover it with self-adhesive bitumenized roofing. Of if you prefer you can use asphalt shingles. Start at the top with a folded edge, and fix the lower edge of the roofing using galvanized staples or tacks.

