-
Locks in interior doors
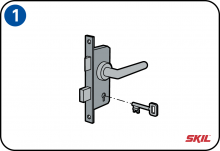
Interior doors are usually fitted with a mortise lock with a latch operated by the door handle or knob. Where the door is self-closing, the latch has an angled or rounded edge and is sprung so that it automatically locks when the door is closed. The same lock can be used in doors that open both to the left and the right. Lockable rooms in many cases also have a locking bolt operated by a key. In contrast to the latch, the locking bolt does not have an angled or rounded edge and is not sprung.
-
Locks in exterior doors
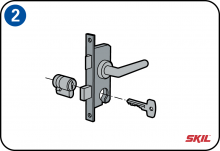
Cylinder locks are the most suitable type for exterior doors. Simple mortise locks are not secure enough for exterior doors. Cylinder locks are fitted into the lock body, and can easily be replaced without having to change the whole lock mechanism.
-
Rim lock
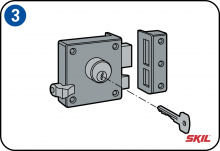
If it is not possible to use a mortise lock, you can fit a rim lock which is mounted on the surface of the door. This may be the case for example with a door that is less than 40 mm thick. With a thin door like this, the recess for a mortise lock would weaken the door structure too much. Rim locks are available with a sprung latch and/or a locking bolt. They are normally only used on exterior doors.
-
Selecting the direction of opening
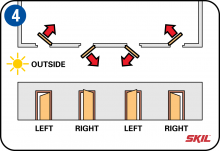
First, check in which direction the door opens. It doesn’t matter whether the door opens to the inside or outside. According to the European standard, examples A and C in the illustration below open to the left, and B and D open to the right.
-
Adjusting the lock
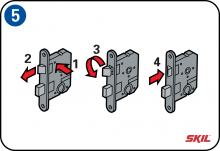
If the latch of the lock faces the wrong way for the opening direction of the door, you will need to turn it round. At the side of the lock body is a small pin which you can push upwards with a narrow screwdriver (1). The latch will then fall forwards out of the lock body (2). You can then turn it round to face the other direction (3) and push it back into place (4).
-
Mark out the position of the lock
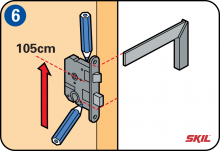
Find the right height for the lock – normally the door handle is at a height of 105 cm. Mark out the positions of the top and bottom of the lock with a pencil on the left or right side of the door. Extend the lines you have marked to the narrow edge of the door using a try square. Once you’ve marked out the top and bottom of the lock on the door edge, draw the vertical center line between them. Place the back of the lock body on the center line and mark out the shape of the lock body with a pencil. This outline now shows where the recess has to be cut in the door edge.
-
Drill out the recess in the door
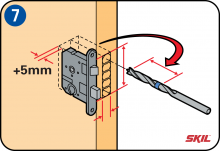
Now mark out the depth of the recess in the door edge. Measure the total depth of the lock body including the retaining plate, which is recessed into the door edge. Set the depth stop of your drill to the right depth, allowing an extra 5 mm. If your drill doesn’t have a depth stop, you can stick a piece of tape to the drill bit to indicate the right depth. Stay within the marked outline – the lock has to fit exactly, but without being forced into place.
-
Finishing with a chisel
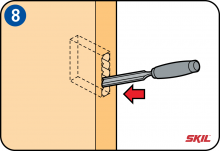
Once you’ve cut out the recess roughly with the drill, you can finish the edges in a straight line with a chisel. Finish the recess neatly until it’s exactly the right shape for the lock body. Keep checking the fit while you’re working, so you don’t make the recess too large.
-
Mark out the retaining plate
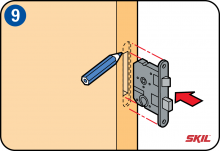
Once you’ve fitted the lock body in the recess, mark out the edge of the retaining plate with a pencil. Remove the lock from the recess.
-
Make a cut-out for the retaining plate
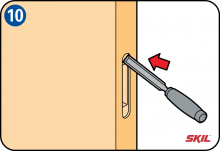
Now you can use the chisel to make a cut-out for the retaining plate. This should have a depth of about 3 mm, just enough for the retaining plate to fit into neatly. The outer face of the retaining plate should be flush with the door edge.
-
Mark out the hole for the door handle
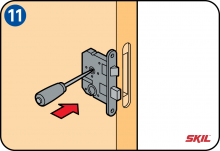
Now you can mark out the holes for the door handle and if applicable the key. Hold the lock body against the front side of the door, with the retaining plate exactly over the recessed part. Mark out the place where the hole needs to be made with a pencil, and then use an awl to make a starting hole for drilling.
-
Drill the hole for the door handle
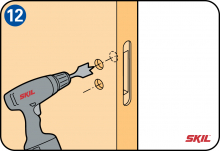
Use a drill bit with a diameter that allows the spindle of the door handle to turn freely. Drill the hole exactly horizontally through to the other side of the door. If necessary, do the same again for the key or cylinder holes. Remove any irregularities in the holes with a wood file.
-
Крок наконечника
Fix a spirit level to your drill, then it’s easy to drill horizontally. -
Fix the retaining plate
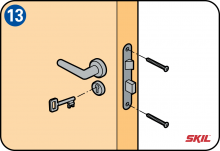
Place the lock back into the recess in the door and secure it with long woodscrews. Fit the door handle and any other fittings. Tighten the handle securely, because it is used often and with a lot of force. If there is any play in the door handle it can cause unsightly damages.
-
Mark out the strike plate on the door frame
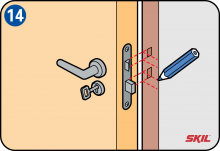
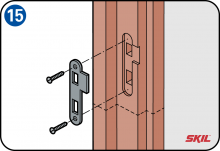
After you’ve fitted the lock in the door, you need to fit the strike plate to the door frame. First mark out the place where the strike plate has to be fitted. Turn the key so the locking bolt protrudes from the lock, and hold the door against the door frame. Use a sharp pencil to mark lines on the door frame at the top and bottom of the locking bolt and the latch. Then with the door open you can extend those lines across the inside of the door frame. With these lines as a guide, you can use the strike plate as a template. Then you can easily mark out the overall outline of the strike plate and the recesses for the latch and locking bolt.
-
Make a cut-out for the strike plate
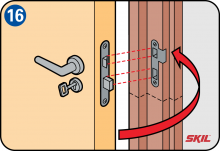
Make a cut-out of about 3 mm deep into which the strike plate fits neatly. The outer face of the strike plate should be flush with the edge of the door frame. The depths of the recesses in the door frame must be equal to the lengths of the latch and locking bolt. Cut out these recesses deeply enough so the latch and locking bolt can fall into them fully. Fix the strike plate to the door frame with long wood screws, and check once again that the latch and locking bolt fall easily into place. If they touch the strike plate you can enlarge the opening slightly with a file, but do this very carefully. If the fit is too loose, the door may rattle when there’s a draft.
-
Bend over the lip of the strike plate
You can carefully bend over the lip of the strike plate with a small plastic hammer, so that it neatly follows the contour of the door frame. The lip is meant to protect the door frame from the impact of the latch, each time the door closes.

