-
Design your cold frame
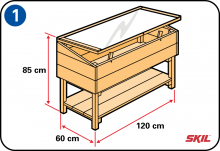
We’ve chosen a wooden structure, which you can finish in colour if you like. We’ll build the cold frame at standing height – that makes it easy for you to work in, and you won’t have to bend down so much. The cold frame has a transparent window to allow plenty of light to enter. The cold frame has sloping sides to allow rainwater to drain off. The glass cover has hinges, so it’s easy to open for ventilation or access to your plants. But don’t forget to close the cover again in the late afternoon, to keep the inside warm.
-
Saw the sloping sides
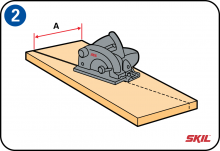
To make the top part of the cold frame, start by sawing a 60 cm plank diagonally into two equal halves. You’ll use these for the sloping side walls that allow rainwater to drain off easily. Measure the difference in height between the high and low ends of the sloping plank (A). This height difference is equal to the difference in length between the front and back leg sections.
-
Assemble the basic frame
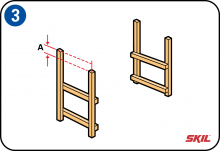
The first step of making a cold frame is to assemble the frame. This is held together by four uprights and four horizontal planks. Then measure the difference in length between the front and back uprights (A), and mark this out. First fix the side planks in place before you saw the uprights to length.
-
Assemble the left side
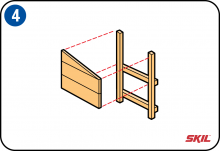
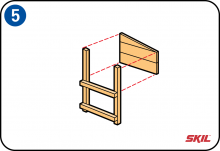
We’ve chosen 2 cm thick planks to make a sturdy structure. Pre-drill all the screw holes to prevent the wood from splitting when you screw the sections together. Screw the left sloping plank to the uprights. Then saw the uprights to the right length with the handsaw.
-
Assemble the right side
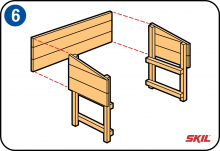
Screw the right sloping plank to the uprights. Use a spirit level to check that the planks are vertical. For a sturdier frame structure, you could consider using waterproof glue for the joints. Then saw the uprights to the right length with the handsaw.
-
Assemble the back panel of the cold frame
Fix the back panel planks to the long uprights so the back panel fits neatly against the left and right sides. Make sure the uprights are properly aligned with the frame at both ends. Use a countersinking drill bit for the screw holes so the screw heads are neatly and smoothly recessed in the surface of the planks.
-
Assemble the front panel
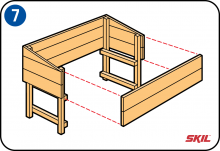
Fix the front panel planks to the short uprights so the panels fit neatly against the left and right sides. Make sure the uprights are properly aligned with the frame at both ends. Take care that the side panels fit together neatly and that the whole structure is vertical.
-
Fit the floor panel
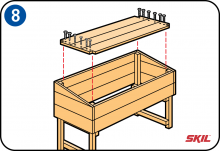
Fix the floor planks to the top horizontal planks. Cut out the recesses for the uprights in the four corners with the jigsaw so the planks fit together neatly. Screw the floor planks in place at the inside.
-
Fit the bottom shelf
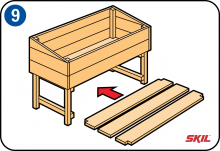
Fix the bottom planks to the bottom horizontal planks. Here too, cut out the recesses for the uprights in the four corners with the jigsaw, so the planks fit together neatly.
-
Make the window frame
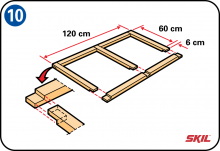
The window frame has the same width as the cold frame itself, but the front edge has an overhang of 6 cm. This is to prevent rainwater from dripping into the cold frame, and to make it easier to open the window. The corners of the window frame are made with half‑lap joints.
If you’re using window glass, you can consider using thicker wood for the window frame because of the extra weight of the glass. Or you could make 2 separate frame sections, which you can open individually.
-
Fit the Plexiglas
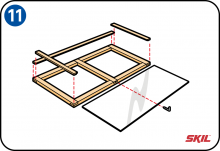
Next we fit wooden retaining strips along the top and on both sides of the window frame. These will hold the Plexiglass window in place. We’ll leave the bottom of the window frame open, so the rainwater can drain away freely. Then we fix the Plexiglass window in place using a screw-in hooks.
-
Fit the top cover
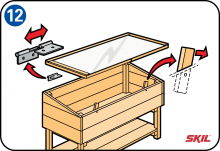
The window is fixed in place at the high side using three hinges.
It’s best to use hinges that you can slide in and out, as these will let you remove the window easily. If you want, you can fit two pivoting stops at the front edge – these will let you leave the window slightly open, with a small gap for ventilation.
-
Fit spacer stays
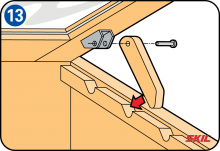
The last assembly job is to make a window stay, so you can leave the window open in different positions. A simple solution is to use a spacing stick which you can saw to the right length.
If you want a neat, adjustable way to keep the window open, you can use the same principle as an old-fashioned deck chair – a wooden stay that engages in a strip of wood in which a number of recesses are cut out. For stability, fit these wooden stays at both sides of the cold frame.
-
Finishing the cold frame
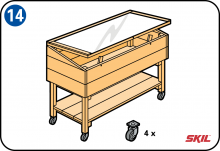
If you want to move your cold frame easily on a hard surface, you can fit steel wheels under the four uprights. This makes it easy to roll your cold frame to a sunny – or shady – spot!

