-
Deciding on the dimensions of the radiator housing
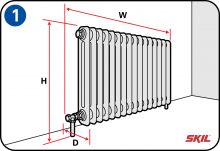
Measure the height (H), width (W) and depth (D) of the radiator (don’t forget to allow for the radiator tap and pipes).
-
Heat circulation
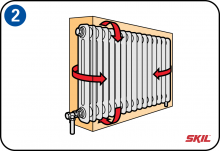
Make sure that heat can circulate freely by leaving enough space between the radiator housing and the radiator itself.
-
Making the panels to size
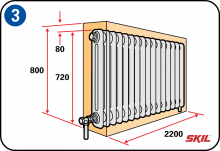
Measure the distance from the floor to the top of the radiator, including the space for air circulation. In this example that means: radiator height 720 + 80 mm circulation space = 800 mm. The length is 2200 mm.Measure the distance from the floor to the top of the radiator, including the space for air circulation. In this example that means: radiator height 720 + 80 mm circulation space = 800 mm. The length is 2200 mm.
-
Thermostatic tap
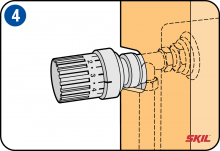
Allow space for the pipes and the thermostatic tap. The tap needs to protrude out of the housing so the temperature in the room can be measures, and to let you adjust the temperature. You can fit the tap so it protrudes from either the side or the front.
-
Fit the top panel to the side panels
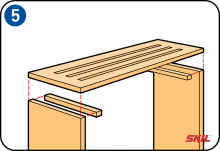
Fit the side panels to the top panel using wood glue and screws or dowels. Use connecting beams to fix all the panels together. You can cut out some grooves in the top panel, or otherwise you can use separate planks as for the front panel. Use beams to fix the panels for a sturdy structure.
-
Front panel
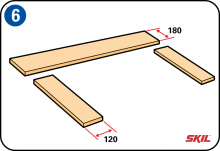
For the top front panel of the radiator housing, use a 180 mm high plank and two 120 mm wide side panels. Fix one side with dowels, the other side follows when you’re ready to fix the horizontal bar.
-
Making dowel joints
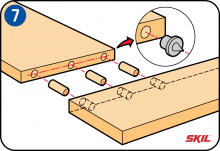
Draw out the positions of the end holes. Drill the holes for the dowels accurately and straight, and use dowels to mark out the other drilling holes, by pressing them together in a flat position and tapping them into place with a rubber hammer. If necessary you can make joints at the inside using brackets, or if you have a router you can cut out a connecting profile and glue it in place.
-
Front panel beams
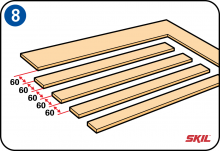
Finish the front panel with four 60 mm horizontal beams and gaps of 60 mm. These openings are necessary to allow the heat from the radiator to circulate. The number of openings depends on your own situation. As an alternative you can also use gauze. This might not look so neat, but you can paint it in a color that matches the radiator housing.
-
Sawing out the holes
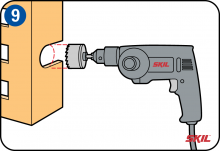
Measure the diameter of the thermostatic tap and its height above the floor. Cut out a good sized hole in one of the side panels using a large hole saw. Then you can use a jigsaw to finish off the recess to the right size. You can fit the tap so it protrudes from either the side or the front.
-
Fitting the radiator housing
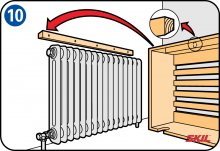
You need to be able to remove the radiator housing for cleaning. To do that we fit the housing with a support bars, like those used to fit kitchen cabinets. First secure the support bars at the top inside the housing.
Place the housing over the radiator and find the right place to fit the support bars against the wall on top of the radiator. Allow for extra space that you may need if you have a windowsill above the radiator.
-
Look out for the position of the radiator tap
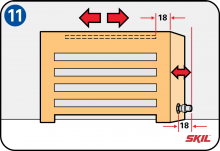
When you determine the length of the support bar, you should allow for the space required by the radiator tap. If the tap is at the side, the support bar needs to have at least 18 cm freedom of movement. A radiator tap on the piping protrudes by about 9 cm. You can also decide to fasten the housing in place with magnets instead of the support bars.

